Redux Essentials, Part 2: Redux App Structure
What You'll Learn
- The structure of a typical React + Redux app
- How to view state changes in the Redux DevTools Extension
Introduction
In Part 1: Redux Overview and Concepts, we looked at why Redux is useful, the terms and concepts used to describe different parts of Redux code, and how data flows through a Redux app.
Now, let's look at a real working example to see how these pieces fit together.
The Counter Example App
The sample project we'll look at is a small counter application that lets us add or subtract from a number as we click buttons. It may not be very exciting, but it shows all the important pieces of a React+Redux application in action.
The project has been created using the official Redux template for Create-React-App. Out of the box, it has already been configured with a standard Redux application structure, using Redux Toolkit to create the Redux store and logic, and React-Redux to connect together the Redux store and the React components.
Here's the live version of the project. You can play around with it by clicking the buttons in the app preview on the right, and browse through the source files on the left.
If you'd like to try create this project on your own computer, you can start a new Create-React-App project using our Redux template:
Using the Counter App
The counter app has already been set up to let us watch what happens inside as we use it.
Open up your browser's DevTools. Then, choose the "Redux" tab in the DevTools, and click the "State" button in the upper-right toolbar. You should see something that looks like this:
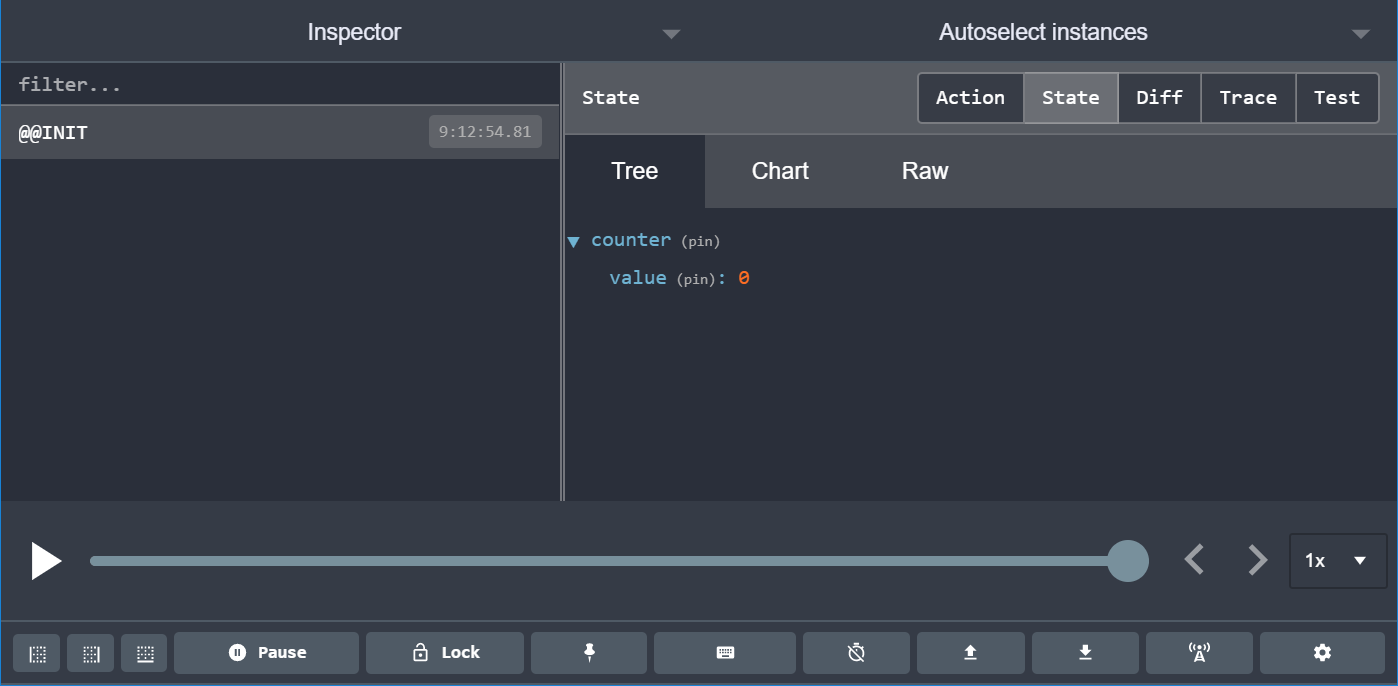
On the right, we can see that our Redux store is starting off with an app state value that looks like this:
The DevTools will show us how the store state changes as we use the app.
Let's play with the app first to see what it does. Click the "+" button in the app, then look at the "Diff" tab in the Redux DevTools:
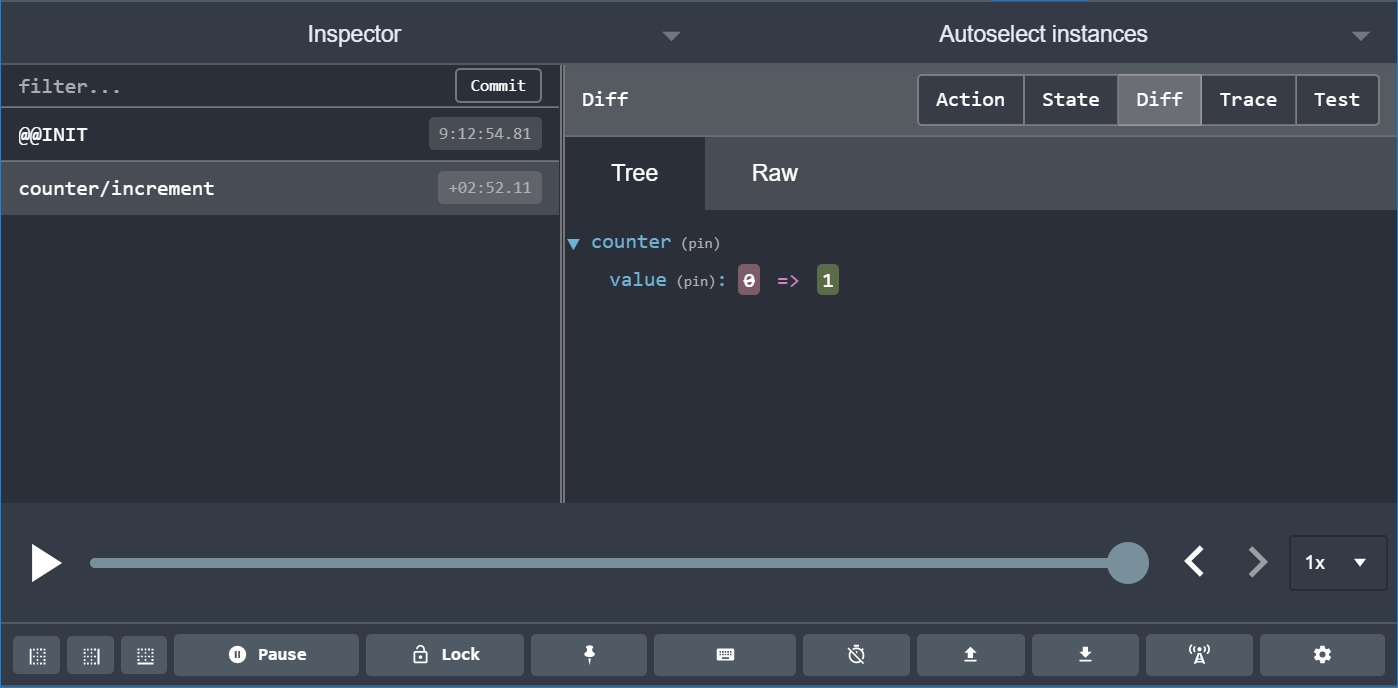
We can see two important things here:
- When we clicked the "+" button, an action with a type of
"counter/increment"was dispatched to the store - When that action was dispatched, the
state.counter.valuefield changed from0to1
Now try these steps:
- Click the "+" button again. The displayed value should now be 2.
- Click the "-" button once. The displayed value should now be 1.
- Click the "Add Amount" button. The displayed value should now be 3.
- Change the number "2" in the textbox to a "3"
- Click the "Add Async" button. You should see a progress bar fill the button, and after a couple seconds, the displayed value should change to 6.
Go back to the Redux DevTools. You should see a total of five actions dispatched, one for each time we clicked a button . Now select the last "counter/increment" entry from the list on the left, and click the "Action" tab on the right side:
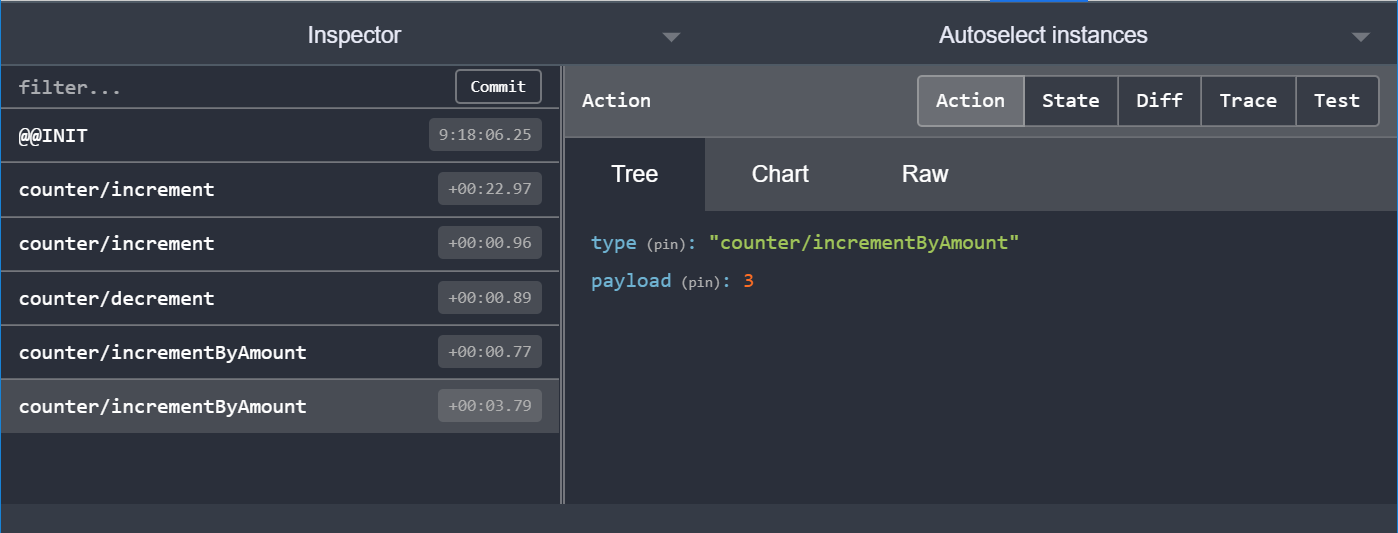
We can see that this action object looked like this:
And if you click the "Diff" tab, you can see that the state.counter.value field changed from a 3 to a 6 in response to that action.
The ability to see what is happening inside of our app and how our state is changing over time is very powerful!
The DevTools have several more commands and options to help you debug your app, and we'll look at a couple of those later.
Application Contents
Now that you know what the app does, let's look at how it works.
Here are the key files that make up this application:
/srcindex.js: the starting point for the appApp.js: the top-level React component/appstore.js: creates the Redux store instance
/features/counterCounter.js: a React component that shows the UI for the counter featurecounterSlice.js: the Redux logic for the counter feature
Let's start by looking at how the Redux store is created.
Creating the Redux Store
Open up app/store.js, which should look like this:
The Redux store is created using the configureStore function from Redux Toolkit. configureStore requires that we pass in a reducer argument.
Our application might be made up of many different features, and each of those features might have its own reducer function. When we call configureStore, we can pass in all of the different reducers in an object. The key names in the object will define the keys in our final state value.
We have a file named features/counter/counterSlice.js that exports a reducer function for the counter logic. We can import that counterReducer function here, and include it when we create the store.
When we pass in an object like {counter: counterReducer}, that says that we want to have a state.counter section of our Redux state object, and that we want the counterReducer function to be in charge of deciding if and how to update the state.counter section whenever an action is dispatched.
Redux allows store setup to be customized with different kinds of plugins ("middleware" and "enhancers"). configureStore automatically adds several middleware to the store setup by default to provide a good developer experience, and also sets up the store so that the Redux DevTools Extension can inspect its contents.
Redux Slices
A "slice" is a collection of Redux reducer logic and actions for a single feature in your app, typically defined together in a single file. The name comes from splitting up the root Redux state object into multiple "slices" of state.
For example, in a blogging app, our store setup might look like:
In that example, state.users, state.posts, and state.comments are each a separate "slice" of the Redux state. Since usersReducer is responsible for updating the state.users slice, we refer to it as a "slice reducer" function.
Detailed Explanation: Reducers and State Structure
A Redux store needs to have a single "root reducer" function passed in when it's created. So if we have many different slice reducer functions, how do we get a single root reducer instead, and how does this define the contents of the Redux store state?
If we tried calling all of the slice reducers by hand, it might look like this:
That calls each slice reducer individually, passes in the specific slice of the Redux state, and includes each return value in the final new Redux state object.
Redux has a function called combineReducers that does this for us automatically. It accepts an object full of slice reducers as its argument, and returns a function that calls each slice reducer whenever an action is dispatched. The result from each slice reducer are all combined together into a single object as the final result. We can do the same thing as the previous example using combineReducers:
When we pass an object of slice reducers to configureStore, it passes those to combineReducers for us to generate the root reducer.
As we saw earlier, you can also pass a reducer function directly as the reducer argument:
Creating Slice Reducers and Actions
Since we know that the counterReducer function is coming from features/counter/counterSlice.js, let's see what's in that file, piece by piece.
Earlier, we saw that clicking the different buttons in the UI dispatched three different Redux action types:
{type: "counter/increment"}{type: "counter/decrement"}{type: "counter/incrementByAmount"}
We know that actions are plain objects with a type field, that the type field is always a string, and that we typically have "action creator" functions that create and return the action objects. So where are those action objects, type strings, and action creators defined?
We could write those all by hand, every time. But, that would be tedious. Besides, what's really important in Redux is the reducer functions, and the logic they have for calculating new state.
Redux Toolkit has a function called createSlice, which takes care of the work of generating action type strings, action creator functions, and action objects. All you have to do is define a name for this slice, write an object that has some reducer functions in it, and it generates the corresponding action code automatically. The string from the name option is used as the first part of each action type, and the key name of each reducer function is used as the second part. So, the "counter" name + the "increment" reducer function generated an action type of {type: "counter/increment"}. (After all, why write this by hand if the computer can do it for us!)
In addition to the name field, createSlice needs us to pass in the initial state value for the reducers, so that there is a state the first time it gets called. In this case, we're providing an object with a value field that starts off at 0.
We can see here that there are three reducer functions, and that corresponds to the three different action types that were dispatched by clicking the different buttons.
createSlice automatically generates action creators with the same names as the reducer functions we wrote. We can check that by calling one of them and seeing what it returns:
It also generates the slice reducer function that knows how to respond to all these action types:
Rules of Reducers
We said earlier that reducers must always follow some special rules:
- They should only calculate the new state value based on the
stateandactionarguments - They are not allowed to modify the existing
state. Instead, they must make immutable updates, by copying the existingstateand making changes to the copied values. - They must not do any asynchronous logic or other "side effects"
But why are these rules important? There's a few different reasons:
- One of the goals of Redux is to make your code predictable. When a function's output is only calculated from the input arguments, it's easier to understand how that code works, and to test it.
- On the other hand, if a function depends on variables outside itself, or behaves randomly, you never know what will happen when you run it.
- If a function modifies other values, including its arguments, that can change the way the application works unexpectedly. This can be a common source of bugs, such as "I updated my state, but now my UI isn't updating when it should!"
- Some of the Redux DevTools capabilities depend on having your reducers follow these rules correctly
The rule about "immutable updates" is particularly important, and worth talking about further.
Reducers and Immutable Updates
Earlier, we talked about "mutation" (modifying existing object/array values) and "immutability" (treating values as something that cannot be changed).
warning
In Redux, our reducers are never allowed to mutate the original / current state values!
So if we can't change the originals, how do we return an updated state?
tip
Reducers can only make copies of the original values, and then they can mutate the copies.
We already saw that we can write immutable updates by hand, by using JavaScript's array / object spread operators and other functions that return copies of the original values. However, if you're thinking that "writing immutable updates by hand this way looks hard to remember and do correctly"... yeah, you're right! :)
Writing immutable update logic by hand is hard, and accidentally mutating state in reducers is the single most common mistake Redux users make.
That's why Redux Toolkit's createSlice function lets you write immutable updates an easier way!
createSlice uses a library called Immer inside. Immer uses a special JS tool called a Proxy to wrap the data you provide, and lets you write code that "mutates" that wrapped data. But, Immer tracks all the changes you've tried to make, and then uses that list of changes to return a safely immutably updated value, as if you'd written all the immutable update logic by hand.
So, instead of this:
You can write code that looks like this:
That's a lot easier to read!
But, here's something very important to remember:
warning
You can only write "mutating" logic in Redux Toolkit's createSlice and createReducer because they use Immer inside! If you write mutating logic in reducers without Immer, it will mutate the state and cause bugs!
With that in mind, let's go back and look at the actual reducers from the counter slice.
We can see that the increment reducer will always add 1 to state.value. Because Immer knows we've made changes to the draft state object, we don't have to actually return anything here. In the same way, the decrement reducer subtracts 1.
In both of those reducers, we don't actually need to have our code look at the action object. It will be passed in anyway, but since we don't need it, we can skip declaring action as a parameter for the reducers.
On the other hand, the incrementByAmount reducer does need to know something: how much it should be adding to the counter value. So, we declare the reducer as having both state and action arguments. In this case, we know that the amount we typed into the textbox is being put into the action.payload field, so we can add that to state.value.
Want to Know More?
For more information on immutability and writing immutable updates, see the "Immutable Update Patterns" docs page and The Complete Guide to Immutability in React and Redux.
Writing Async Logic with Thunks
So far, all the logic in our application has been synchronous. Actions are dispatched, the store runs the reducers and calculates the new state, and the dispatch function finishes. But, the JavaScript language has many ways to write code that is asynchronous, and our apps normally have async logic for things like fetching data from an API. We need a place to put that async logic in our Redux apps.
A thunk is a specific kind of Redux function that can contain asynchronous logic. Thunks are written using two functions:
- An inside thunk function, which gets
dispatchandgetStateas arguments - The outside creator function, which creates and returns the thunk function
The next function that's exported from counterSlice is an example of a thunk action creator:
We can use them the same way we use a typical Redux action creator:
However, using thunks requires that the redux-thunk middleware (a type of plugin for Redux) be added to the Redux store when it's created. Fortunately, Redux Toolkit's configureStore function already sets that up for us automatically, so we can go ahead and use thunks here.
When you need to make AJAX calls to fetch data from the server, you can put that call in a thunk. Here's an example that's written a bit longer, so you can see how it's defined:
We'll see thunks being used in Part 5: Async Logic and Data Fetching
Detailed Explanation: Thunks and Async Logic
We know that we're not allowed to put any kind of async logic in reducers. But, that logic has to live somewhere.
If we have access to the Redux store, we could write some async code and call store.dispatch() when we're done:
But, in a real Redux app, we're not allowed to import the store into other files, especially in our React components, because it makes that code harder to test and reuse.
In addition, we often need to write some async logic that we know will be used with some store, eventually, but we don't know which store.
The Redux store can be extended with "middleware", which are a kind of add-on or plugin that can add extra abilities. The most common reason to use middleware is to let you write code that can have async logic, but still talk to the store at the same time. They can also modify the store so that we can call dispatch() and pass in values that are not plain action objects, like functions or Promises.
The Redux Thunk middleware modifies the store to let you pass functions into dispatch. In fact, it's short enough we can paste it here:
It looks to see if the "action" that was passed into dispatch is actually a function instead of a plain action object. If it's actually a function, it calls the function, and returns the result. Otherwise, since this must be an action object, it passes the action forward to the store.
This gives us a way to write whatever sync or async code we want, while still having access to dispatch and getState.
There's one more function in this file, but we'll talk about that in a minute when we look at the <Counter> UI component.
Want to Know More?
See the Redux Thunk docs, the post What the heck is a thunk? and the Redux FAQ entry on "why do we use middleware for async?" for more information.
The React Counter Component
Earlier, we saw what a standalone React <Counter> component looks like. Our React+Redux app has a similar <Counter> component, but it does a few things differently.
We'll start by looking at the Counter.js component file:
Like with the earlier plain React example, we have a function component called Counter, that stores some data in a useState hook.
However, in our component, it doesn't look like we're storing the actual current counter value as state. There is a variable called count, but it's not coming from a useState hook.
While React includes several built-in hooks like useState and useEffect, other libraries can create their own custom hooks that use React's hooks to build custom logic.
The React-Redux library has a set of custom hooks that allow your React component to interact with a Redux store.
Reading Data with useSelector
First, the useSelector hook lets our component extract whatever pieces of data it needs from the Redux store state.
Earlier, we saw that we can write "selector" functions, which take state as an argument and return some part of the state value.
Our counterSlice.js has this selector function at the bottom:
If we had access to a Redux store, we could retrieve the current counter value as:
Our components can't talk to the Redux store directly, because we're not allowed to import it into component files. But, useSelector takes care of talking to the Redux store behind the scenes for us. If we pass in a selector function, it calls someSelector(store.getState()) for us, and returns the result.
So, we can get the current store counter value by doing:
We don't have to only use selectors that have already been exported, either. For example, we could write a selector function as an inline argument to useSelector:
Any time an action has been dispatched and the Redux store has been updated, useSelector will re-run our selector function. If the selector returns a different value than last time, useSelector will make sure our component re-renders with the new value.
Dispatching Actions with useDispatch
Similarly, we know that if we had access to a Redux store, we could dispatch actions using action creators, like store.dispatch(increment()). Since we don't have access to the store itself, we need some way to have access to just the dispatch method.
The useDispatch hook does that for us, and gives us the actual dispatch method from the Redux store:
From there, we can dispatch actions when the user does something like clicking on a button:
Component State and Forms
By now you might be wondering, "Do I always have to put all my app's state into the Redux store?"
The answer is NO. Global state that is needed across the app should go in the Redux store. State that's only needed in one place should be kept in component state.
In this example, we have an input textbox where the user can type in the next number to be added to the counter:
We could keep the current number string in the Redux store, by dispatching an action in the input's onChange handler and keeping it in our reducer. But, that doesn't give us any benefit. The only place that text string is used is here, in the <Counter> component. (Sure, there's only one other component in this example: <App>. But even if we had a larger application with many components, only <Counter> cares about this input value.)
So, it makes sense to keep that value in a useState hook here in the <Counter> component.
Similarly, if we had a boolean flag called isDropdownOpen, no other components in the app would care about that - it should really stay local to this component.
In a React + Redux app, your global state should go in the Redux store, and your local state should stay in React components.
If you're not sure where to put something, here are some common rules of thumb for determining what kind of data should be put into Redux:
- Do other parts of the application care about this data?
- Do you need to be able to create further derived data based on this original data?
- Is the same data being used to drive multiple components?
- Is there value to you in being able to restore this state to a given point in time (ie, time travel debugging)?
- Do you want to cache the data (ie, use what's in state if it's already there instead of re-requesting it)?
- Do you want to keep this data consistent while hot-reloading UI components (which may lose their internal state when swapped)?
This is also a good example of how to think about forms in Redux in general. Most form state probably shouldn't be kept in Redux. Instead, keep the data in your form components as you're editing it, and then dispatch Redux actions to update the store when the user is done.
One other thing to note before we move on: remember that incrementAsync thunk from counterSlice.js? We're using it here in this component. Notice that we use it the same way we dispatch the other normal action creators. This component doesn't care whether we're dispatching a normal action or starting some async logic. It only knows that when you click that button, it dispatches something.
Providing the Store
We've seen that our components can use the useSelector and useDispatch hooks to talk to the Redux store. But, since we didn't import the store, how do those hooks know what Redux store to talk to?
Now that we've seen all the different pieces of this application, it's time to circle back to the starting point of this application and see how the last pieces of the puzzle fit together.
We always have to call ReactDOM.render(<App />) to tell React to start rendering our root <App> component. In order for our hooks like useSelector to work right, we need to use a component called <Provider> to pass down the Redux store behind the scenes so they can access it.
We already created our store in app/store.js, so we can import it here. Then, we put our <Provider> component around the whole <App>, and pass in the store: <Provider store={store}>.
Now, any React components that call useSelector or useDispatch will be talking to the Redux store we gave to the <Provider>.
What You've Learned
Even though the counter example app is pretty small, it showed all the key pieces of a React + Redux app working together. Here's what we covered:
tip
- We can create a Redux store using the Redux Toolkit
configureStoreAPIconfigureStoreaccepts areducerfunction as a named argumentconfigureStoreautomatically sets up the store with good default settings
- Redux logic is typically organized into files called "slices"
- A "slice" contains the reducer logic and actions related to a specific feature / section of the Redux state
- Redux Toolkit's
createSliceAPI generates action creators and action types for each individual reducer function you provide
- Redux reducers must follow specific rules
- Should only calculate a new state value based on the
stateandactionarguments - Must make immutable updates by copying the existing state
- Cannot contain any asynchronous logic or other "side effects"
- Redux Toolkit's
createSliceAPI uses Immer to allow "mutating" immutable updates
- Should only calculate a new state value based on the
- Async logic is typically written in special functions called "thunks"
- Thunks receive
dispatchandgetStateas arguments - Redux Toolkit enables the
redux-thunkmiddleware by default
- Thunks receive
- React-Redux allows React components to interact with a Redux store
- Wrapping the app with
<Provider store={store}>enables all components to use the store - Global state should go in the Redux store, local state should stay in React components
- Wrapping the app with
What's Next?
Now that you've seen all the pieces of a Redux app in action, it's time to write your own! For the rest of this tutorial, you'll be building a larger example app that uses Redux. Along the way, we'll cover all the key ideas you need to know to use Redux the right way.
Continue on to Part 3: Basic Redux Data Flow to get started building the example app.